


While I’m always a big fan of a classic cinnamon roll, I have to admit I’m extremely partial to fruit filled versions. These raspberry jam rolls are filled with homemade raspberry jam, and topped with a raspberry cream cheese frosting. They’re full of bright flavor, with extra gooey centers. If you’re intimidated by baking with yeast, don’t be! These are super simple to make, and very beginner friendly for working with yeasted doughs.
Making the raspberry jam
This raspberry jam rolls recipe calls for making the jam from scratch. While this might seem like a lengthy extra step, it’s actually very quick and easy to do. All you need are 3 ingredients to make the delicious filling for these rolls, and the best part? This recipe makes more jam than you will use in the rolls, so you’l have some extra to enjoy later.
To make the raspberry jam, simply add the raspberries, sugar, and a squeeze of lemon juice to a heavy bottomed pot. You can use either fresh or frozen raspberries. Place a small saucer or plate in the freezer (we will use this to check the consistency of the jam). Bring the jam ingredients to a boil over medium heat, taking care to mash the raspberries throughly. Sometimes sugar can be stubborn about dissolving, so make sure to stir thoroughly with the raspberry juices to encourage it to melt.
Boil hard for about 5 minutes, or until the mixture starts to thicken and form a gel. You can check for doneness by adding a small amount of the jam to the cold plate from the freezer. Let it cool for about 30 seconds, and then run your finger through it. If it wrinkles at all, even slightly, it is ready. If it is still very thin, put it back on the heat and boil for another 1-2 minutes, and retest until ready. Leftover jam can be stored in the fridge for 1-2 weeks.
Frosting flavors
Cream cheese frosting is traditional for these types of rolls. For these raspberry jam rolls, they have a bit of the homemade raspberry jam mixed in for extra fruity flavor, and a beautiful pink color.

The secret to the perfect jam roll
Nothing is more disappointing than biting into a beautiful jam roll and finding a dry center. Many recipes suggest under baking to ensure a tender middle, but that can still be difficult to judge. These raspberry jam rolls have perfectly gooey middles (without under baking!) but what’s the secret? Cream!
My favorite way to get perfectly gooey rolls every time is to pour 1/2 cup of room temperature cream all over the rolls right before they hit the oven. This ensures that they bake properly, while leaving the middle perfectly tender and soft. While this step is optional, I highly recommend it. Trust me, you’ll never bake jam rolls or cinnamon rolls without this step again!
Equipment
One of the best parts about making these raspberry jam rolls is that you don’t need any fancy equipment. They’re very easy to adapt to whatever tools you have on hand. While this recipe calls for using a stand mixer to knead the dough, you can absolutely do it by hand on a floured surface. Just be aware that it will take 5-10 minutes longer for the dough to be ready when kneaded by hand.
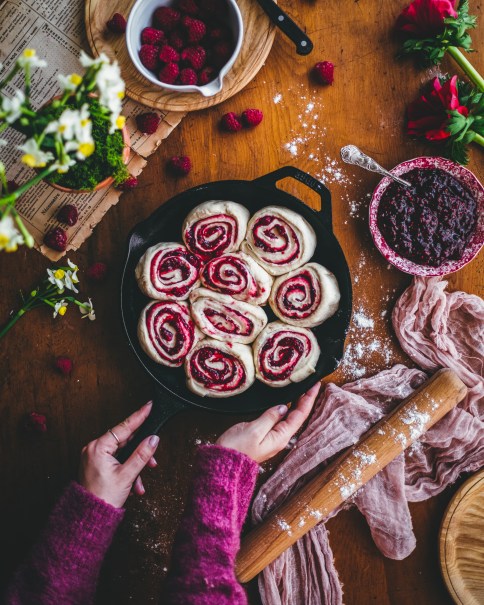
You can bake these rolls in several types of pans. I like to make mine in a round cast iron skillet (at least 9″ in diameter), but you can also use a 9″ cake pan, or a 9″x13″ rectangular baking pan. Just make sure that whatever pan you choose has at least 1.5″ sides, as these buns get very fluffy when baked!

Using yeast
Because this recipe calls for instant dry yeast instead of dry active yeast, it is not necessary to proof, or bloom the yeast before adding it to the dough mix. Simply combine all of the dough ingredients, including the yeast, except for the butter in the bowl of a stand mixer, or a large bowl if kneading by hand.
Because there is no initial proofing step, using instant dry yeast (or IDY) is very simple, and very beginner-baker friendly. The recipe for this dough is adapted from the formula used by one of my wonderful friends James Bridges, owner of the Grainwright bakery in Louisville, Kentucky
How to make these raspberry jam rolls
This recipe is best made using grams as measurement, but I have also included volumetric measurements. Just know that the recipe is more accurate in grams. Using a stand mixer fitted with the dough hook attachment on a low speed, knead the dough for about 5 minutes or until the dough is no longer shaggy, but still has some lumps. Slowly add the butter, one small piece at a time, until it is fully incorporated into the dough. Continue to knead it is smooth, elastic, and the sides of the bowl are clean, about 5 more minutes.
The windowpane test
When working with yeasted doughs, we need to build gluten strength through the kneading process in order to give our bake structure. To check the strength of your dough, take a small amount of dough in your fingers and stretch it as thin as you can without tearing it. If you can stretch it thin enough to read newspaper print through it, the dough is ready. This test is called the windowpane test, because the dough should be able to stretch thinly enough that you can see through it like a windowpane. If the gluten is not developed enough and the dough tears, knead for 1-2 more minutes before checking again.
If the dough is too sticky (meaning it sticks to sides of the bowl), add flour, 1 tbsp at a time as needed. Be careful not to add too much or the rolls will turn out dense and dry.
If you prefer to knead by hand, do so on a floured surface until the dough is smooth and elastic, about 10-15 mins, or until the dough is smooth and elastic and passes the windowpane test.
Place the kneaded dough in a clean and lightly oiled bowl in a warm, draft free place and allow to rise, covered with a tea towel, until doubled, about 1-1.5 hrs. This time may be more or less depending on the temperature of your home.
How to shape the raspberry jam rolls
When the dough has finished proofing, preheat the oven to 350°F.
Once the dough has doubled in size, turn it out onto a lightly floured surface and roll it into a rectangle that is 12″x18″. Use a ruler or straight edged tool to square up the corners nicely for neater rolling.
Using an offset spatula, spread the very soft butter all over the dough, leaving about a 1/4″ margin. Next, add a layer of the jam, and scatter with frozen (or fresh) raspberries.


Starting with the long side, tightly roll the dough into a log, pinching the seam closed on the bottom. Trim the ends, and using a serrated knife or twine, cut into 12 equal rolls. Grease and line your baking vessel of choice (9″x13″ pan or large cast iron skillet works best, but a cake pan will also work), add the buns, and cover and allow to proof for 30-45 mins until puffy.
The secret to a tender center
Just before baking, pour the cream over the proofed rolls, taking care to get in all the gaps. This step is optional but HIGHLY recommended. The cream makes the rolls so perfectly tender in the middle, and gives an extra richness in flavor! You can also use plant based milk or cream for this step.
Baking and serving
Bake for 20-25 minutes, until the buns are lightly golden on the tops. If you prefer your buns extra gooey, you can aim for under-baking, though the cream makes them very tender.
Making the frosting is simple: just beat all the frosting ingredients using a hand held mixer or stand mixer until creamy and smooth. I recommend using cream cheese that comes in a brick form and has full fat. The brick form gives a better texture and taste than the tub kind.

The buns are ready when they’re golden on the tops, but not too dark. Allow the raspberry jam rolls to cool for 10 minutes before frosting, topping with fresh raspberries, and serving.
How to store these rolls
These raspberry jam rolls are best eaten same day, but keep well, and can be stored in an airtight container in the fridge for 3-5 days (if they last that long!) Warm them up for 30 seconds in the microwave before enjoying.


I hope you give these raspberry jam rolls a try! Be sure to tag me on instagram so I can see your bakes, and leave me a comment below! Your feedback helps other bakers who are giving this recipe a try, and I love hearing about your bakes!


2 Comments
Nikki
April 15, 2023 at 9:38 am
Hello! You don’t mention how much butter is added to the dough, or I might just be missing it somewhere ?
marissamakes
April 15, 2023 at 9:43 am
Great catch, Nikki! I’ve just updated the recipe, but its 24g of room temperature butter, or about 2 tablespoons.